In this blog post, we’re going to break down what the Typio divider line is all about!
What is the Typio divider line?
During a Typio lesson, the user is presented with a visual and audible typing prompt. The visual prompt is on the top half of the screen, while the user’s typing progress is displayed on bottom half of the screen. Between the two is the visual divider line. On first glance, all this line does is separate the prompt and the progress but it really does so much more for our low vision users!
Visual Progress
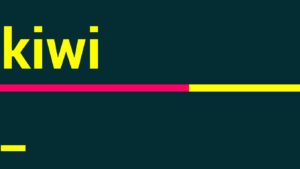
In addition to being a simple visual break between the typing prompt and student progress, the divider line also slowly fills up with a second color after each letter is typed. This allows the divider bar to provide visual progress of how much of the current lesson is completed. It’s worth mentioning this can also be accomplished audibly by pressing the Alt key, which will read the progress aloud.
Visual Anchor
Another great use of the divider line is using it as a visual anchor! Students with a reduced visual field have had success by first scanning the screen from top to bottom to find the divider line. Then following it to the left, until they reach the edge of the screen. From there, the student knows the typing prompt can be found above the line and their progress below.
So there you have it. You now know the tricks of the trade regarding the divider bar!